Your first app
In this section, you’ll start building your own app.
Initialize your app
In the previous section you used the example app. In your installation folder you should be able to find its source code in the folder data_admin_examples/example1. You can also see it online at https://github.com/frePPLe/frepple-data-admin/tree/master/data_admin_examples/example1
An app is nothing more than a python package with a specifically structured content. The steps will walk you through the process of adding your own app.
Create a new folder my_app in your data_admin_examples folder and add an empty __init__.py file in it.
data_admin_examples
   |- example1
   |- my-app
   |   |- __init__.py
Register your app
Next, register the app in the web server.
Open the djangosettings.py file and add a new line in the INSTALLED_APPS sections. Note that the ordering of the apps is important - apps higher in the list can override functionality of apps lower in the list.
 INSTALLED_APPS = (
     "django.contrib.auth",
     "django.contrib.contenttypes",
     "django.contrib.messages",
     "django.contrib.staticfiles",
     "data_admin.boot",
     "data_admin_examples.example1",   # <<< The example app
     "data_admin_examples.my_app",   # <<< Your own app
     "data_admin.execute",
     "data_admin.common",
     "django_filters",
     "rest_framework",
     "django_admin_bootstrapped",
     "django.contrib.admin",
 )
Define the database models
Add a file called models.py to describe new database models. It defines the database tables, their fields and indexes.
data_admin_examples
   |- example1
   |- my-app
   |   |- __init__.py
   |   |- models.py
A minimal example looks as follows. An online copy is available on https://github.com/frePPLe/frepple-data-admin/tree/master/data_admin/docs/getting_started/my_app/models.py
from django.db import models
from django.utils.translation import ugettext_lazy as _
from data_admin.common.models import AuditModel

class My_Model(AuditModel):
    # Database fields
    name = models.CharField(_("name"), max_length=300, primary_key=True)
    charfield = models.CharField(
        _("charfield"),
        max_length=300,
        null=True,
        blank=True,
        help_text=_("A sample character field"),
    )
    booleanfield = models.BooleanField(
        _("booleanfield"),
        blank=True,
        default=True,
        help_text=_("A sample boolean field"),
    )
    decimalfield = models.DecimalField(
        _("decimalfield"),
        max_digits=20,
        decimal_places=8,
        default="0.00",
        help_text=_("A sample decimal field"),
    )

    class Meta(AuditModel.Meta):
        db_table = "my_model"  # Name of the database table
        verbose_name = _("my model")  # A translatable name for the entity
        verbose_name_plural = _("my models")  # Plural name
        ordering = ["name"]
This file only declares the model structure. The actual table will be created in a later step.
You can find all details on models and fields on https://docs.djangoproject.com/en/2.2/ref/models/fields/
Create tables and fields in the database
Now we create database tables in the PostgreSQL database for each of your models. This is done by in two steps.
In the first step we generate a Python file that defines the evolution of your database model.
frepplectl makemigrations my_app

   Migrations for 'my_app':
     data_admin_examples\my_app\migrations\0001_initial.py
       - Create model My_Model
The command created a new folder in your app:
data_admin_examples
   |- example1
   |- my-app
   |   |- __init__.py
   |   |- models.py
   |   |- migrations
   |       |- __init__.py
   |       |- 0001_initial.py
It is very important to run the makemigration script after EVERY update of the models.py file. For every change an extra migration file is generated.
In a second step you will actually execute the migrations generated in the previous step and create the database tables. This command will incrementally bring the database schema up to date. The database schema migration allows upgrading between different versions of your app without loss of data and without recreating the database from scratch.
frepplectl.py migrate

   Operations to perform:
     Apply all migrations: admin, auth, common, contenttypes, example1, execute, my_app
   Running migrations:
     Applying my_app.0001_initial... OK
The first step is done by the developer that is updating the models.py file. The second step is executed by everybody that is installing your app (or upgrading it to a new release). You can find all details on migrations on https://docs.djangoproject.com/en/2.2/topics/migrations/
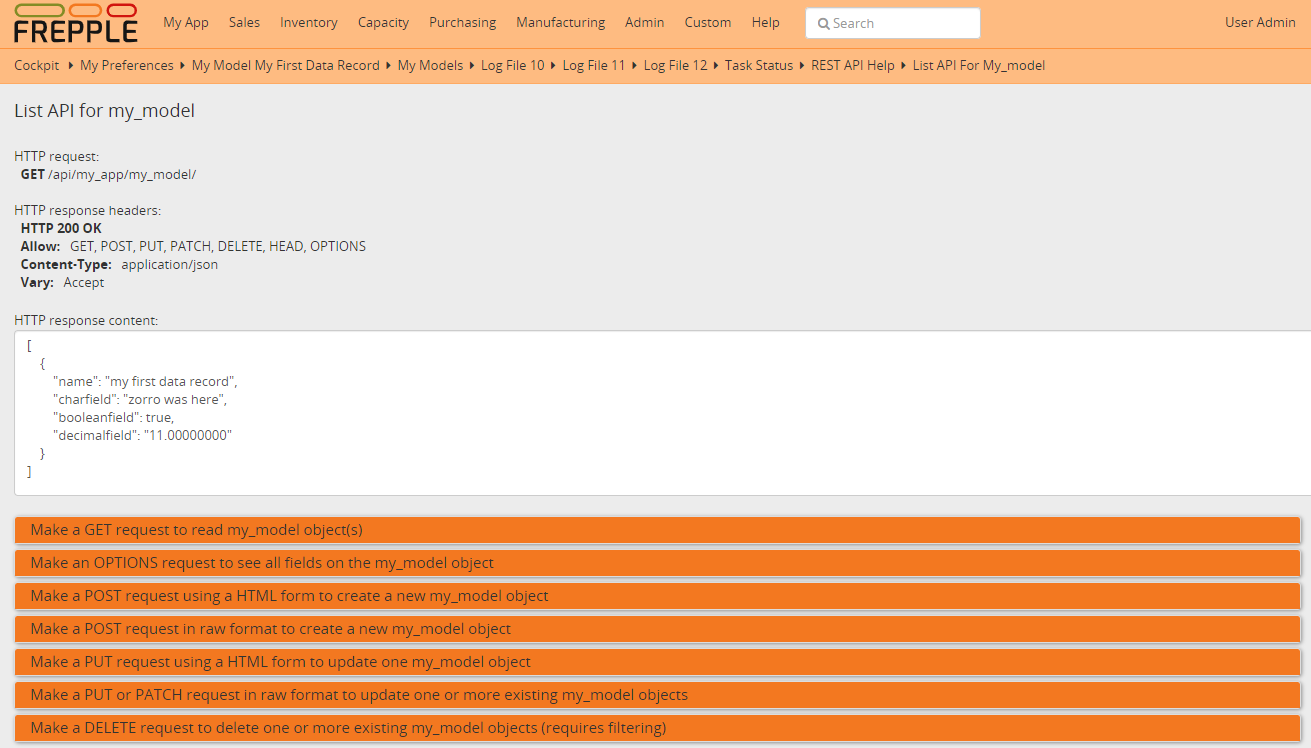
Define a REST API for your models
The file serializers.py defines a REST API for your models. You can explore the REST API from the menu “help/REST API help”. An online copy is available on https://github.com/frePPLe/frepple-data-admin/tree/master/data_admin/docs/getting_started/my_app/serializers.py
data_admin_examples
   |- example1
   |- my-app
   |   |- __init__.py
   |   |- models.py
   |   |- migrations
   |   |   |- __init__.py
   |   |   |- 0001_initial.py
   |   |- serializers.py
from django_filters import rest_framework as filters
from rest_framework_bulk.drf3.serializers import BulkListSerializer, BulkSerializerMixin
from data_admin.common.api.views import (
    frePPleListCreateAPIView,
    frePPleRetrieveUpdateDestroyAPIView,
)
from data_admin.common.api.serializers import ModelSerializer
from .models import My_Model

class MyModelFilter(filters.FilterSet):
    class Meta:
        model = My_Model
        fields = {
            "name": ["exact", "in", "contains"],
            "charfield": ["exact", "contains"],
            "booleanfield": ["exact"],
            "decimalfield": ["exact", "in", "gt", "gte", "lt", "lte"],
            "source": ["exact", "in"],
            "lastmodified": ["exact", "in", "gt", "gte", "lt", "lte"],
        }
        filter_fields = ("name", "charfield", "booleanfield", "decimalfield")


class MyModelSerializer(BulkSerializerMixin, ModelSerializer):
    class Meta:
        model = My_Model
        fields = ("name", "charfield", "booleanfield", "decimalfield")
        list_serializer_class = BulkListSerializer
        update_lookup_field = "name"
        partial = True


class MyModelSerializerAPI(frePPleListCreateAPIView):
    queryset = My_Model.objects.all()
    serializer_class = MyModelSerializer
    filter_class = MyModelFilter
You can find all details on creating REST APIs on https://www.django-rest-framework.org/
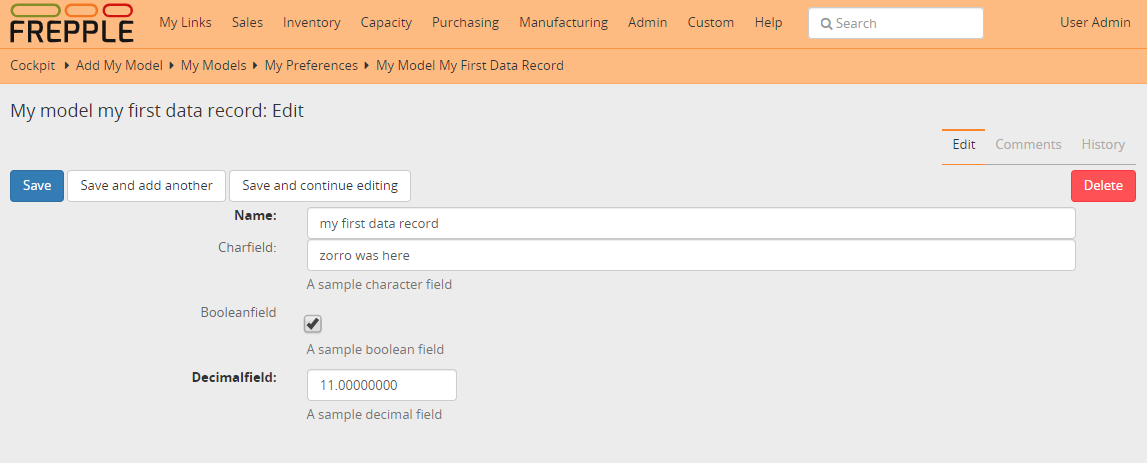
Create editing forms for your models
The file admin.py defines a form to edit objects of your models. An online copy is available on https://github.com/frePPLe/frepple-data-admin/tree/master/data_admin/docs/getting_started/my_app/admin.py
data_admin_examples
   |- example1
   |- my-app
   |   |- __init__.py
   |   |- models.py
   |   |- migrations
   |   |   |- __init__.py
   |   |   |- 0001_initial.py
   |   |- serializers.py
   |   |- admin.py
from django.utils.translation import gettext_lazy as _
from data_admin.admin import data_site
from data_admin.common.adminforms import MultiDBModelAdmin
from .models import My_Model

@admin.register(My_Model, site=data_site)
class My_Model_Admin(MultiDBModelAdmin):
    model = My_Model
    fields = ("name", "charfield", "booleanfield", "decimalfield")
    save_on_top = True
    # Defines tabs shown on the edit form
    tabs = [
        {
            "name": "edit",
            "label": _("edit"),
            "view": "admin:my_app_my_model_change",
            "permissions": "my_app.change_my_model",
        },
        {
            "name": "comments",
            "label": _("comments"),
            "view": "admin:my_app_my_model_comment",
        },
        {
            "name": "history",
            "label": _("History"),
            "view": "admin:my_app_my_model_history",
        },
    ]
You can find all details on admin forms on https://docs.djangoproject.com/en/2.2/ref/contrib/admin/
Define new reports
New reports are defined in a file views.py. The classes in this file typically will run SQL statements to retrieve data from the database, apply the correct business logic and return HTML code to the user’s browser.
In this example we will inherit from a class that allows us to display an editable grid for our new model. An online copy is available on https://github.com/frePPLe/frepple-data-admin/tree/master/data_admin/docs/getting_started/my_app/views.py
data_admin_examples
   |- example1
   |- my-app
   |   |- __init__.py
   |   |- models.py
   |   |- migrations
   |   |   |- __init__.py
   |   |   |- 0001_initial.py
   |   |- serializers.py
   |   |- admin.py
   |   |- views.py
from django.utils.translation import gettext_lazy as _
from data_admin.common.report import (
GridReport,
GridFieldText,
GridFieldNumber,
GridFieldBoolNullable,
GridFieldLastModified,
)
from .models import My_Model
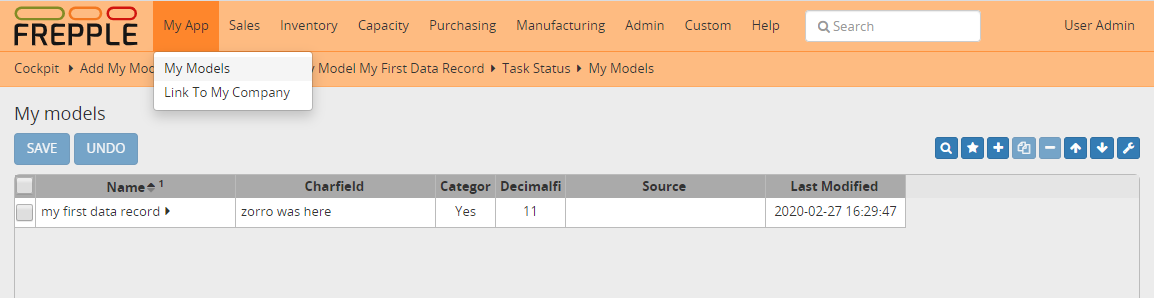
class MyModelList(GridReport):
"""
This report show an editable grid for your models.
You can sort data, filter data, import excel files, export excel files.
"""
title = _("My models")
basequeryset = My_Model.objects.all()
model = My_Model
frozenColumns = 1
rows = (
GridFieldText(
"name",
title=_("name"),
key=True,
formatter="detail",
extra='"role":"my_app/my_model"',
),
GridFieldText("charfield", title=_("charfield")),
GridFieldBoolNullable("booleanfield", title=_("category")),
GridFieldNumber("decimalfield", title=_("decimalfield")),
GridFieldText("source", title=_("source")),
GridFieldLastModified("lastmodified"),
)
More advanced views can also separate the python business logic from the HTML rendering. This example app doesn’t explore this.
See this page for more details on the structure of the report code.
Register the URLs of the new reports
The url where the report is published is defined in the file urls.py. An online copy is available on https://github.com/frePPLe/frepple-data-admin/tree/master/data_admin/docs/getting_started/my_app/urls.py
data_admin_examples
   |- example1
   |- my-app
   |   |- __init__.py
   |   |- models.py
   |   |- migrations
   |   |   |- __init__.py
   |   |   |- 0001_initial.py
   |   |- serializers.py
   |   |- admin.py
   |   |- views.py
   |   |- urls.py
from django.conf.urls import url
from .views import MyModelList
from .serializers import MyModelSerializerAPI

# Automatically add these URLs when the application is installed
autodiscover = True

urlpatterns = [
    # Model list reports, which override standard admin screens
    url(
        r"^data/my_app/my_model/$",
        MyModelList.as_view(),
        name="my_app_my_model_changelist",
    ),
    # URLs for the REST API
    url(r"^api/my_app/my_model/$", MyModelSerializerAPI.as_view()),
]
You can find more detailed information on https://docs.djangoproject.com/en/2.2/topics/http/urls/
Add demo data
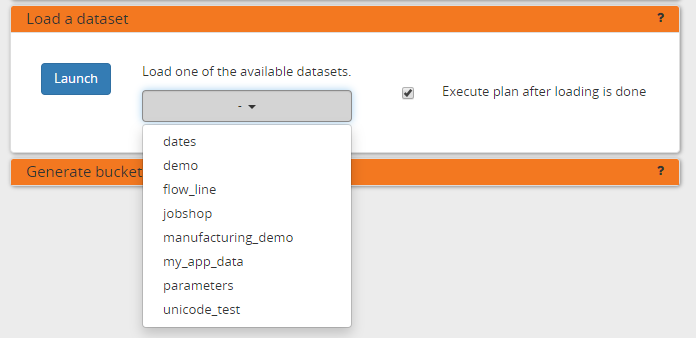
In the subfolder fixtures you can define demo datasets that can be loaded with the command “frepplectl loaddata” or interactively in the execution screen.
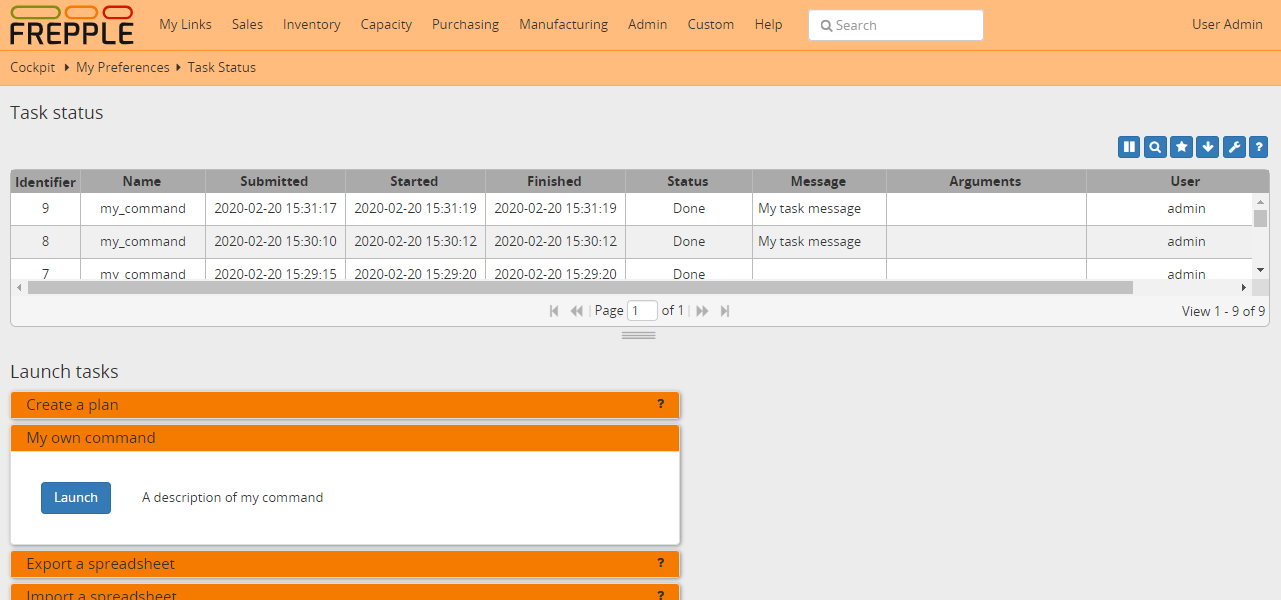
Fixtures are text files in JSON format. They can be loaded from the command line, from the execution screen (see the “my_app_data” entry in the screenshot below) or through a web API.
data_admin_examples
   |- example1
   |- my-app
   |   |- __init__.py
   |   |- models.py
   |   |- migrations
   |   |   |- __init__.py
   |   |   |- 0001_initial.py
   |   |- serializers.py
   |   |- admin.py
   |   |- views.py
   |   |- urls.py
   |   |- menu.py
| |- fixtures
| | |- my_app_data.json
[
{"model": "my_app.my_model", "fields": {"name": "sample #1", "charfield": "A", "booleanfield": true, "decimalfield": 999.0}},
{"model": "my_app.my_model", "fields": {"name": "sample #2", "charfield": "B", "booleanfield": false, "decimalfield": 666.0}}
]
You can find more detailed information on https://docs.djangoproject.com/en/2.2/howto/initial-data/
Add custom administration commands
Files in the folder management/commands define extra commands. You can execute the custom commands from the command line, through a web API or interactively from the execution screen.
# Run from the command line
frepplectl my_command
# Web API of the command
POST /execute/api/my_command/
Simplified, the code for a command looks as follows. An online copy is available on https://github.com/frePPLe/frepple-data-admin/tree/master/data_admin/docs/getting_started/my_app/management/commands/my_command.py
data_admin_examples
   |- example1
   |- my-app
   |   |- __init__.py
   |   |- models.py
   |   |- migrations
   |   |   |- __init__.py
   |   |   |- 0001_initial.py
   |   |- serializers.py
   |   |- admin.py
   |   |- views.py
   |   |- urls.py
   |   |- menu.py
   |   |- fixtures
   |   |   |- my_app_data.json
| |- management
| |- __init__.py
| |- commands
| |- __init__.py
| |- my_command.py
class Command(BaseCommand):
    # Help text shown when you run "frepplectl help my_command"
    help = "This command does ..."

    # Define optional and required arguments
    def add_arguments(self, parser):
        parser.add_argument(
            "--my_arg",
            dest="my_arg",
            type=int,
            default=0,
            help="an optional argument for the command",
        )

    # The busisness logic of the command goes in this method
    def handle(self, *args, **options):
        print("This command was called with argument %s" % options["my_arg"])

    # Label to display on the execution screen
    title = _("My own command")

    # Sequence of the command on the execution screen
    index = 1

    # This method generates the text to display on the execution screen
    @staticmethod
    def getHTML(request):
        context = RequestContext(request)
        template = Template(
            """
            {% load i18n %}
            <form class="form" role="form" method="post"
               action="{{request.prefix}}/execute/launch/my_command/">{% csrf_token %}
            <table>
            <tr>
              <td style="padding:15px; vertical-align:top">
              <button  class="btn btn-primary" id="load" type="submit">{% trans "launch"|capfirst %}</button>
              </td>
              <td style="padding:15px">
              A description of my command
              </td>
            </tr>
            </table>
            </form>
            """
        )
        return template.render(context)
You can find more detailed information on https://docs.djangoproject.com/en/2.2/howto/custom-management-commands/
Add unit tests
Unit tests are defined in the file tests.py. They are executed when you run the command:
# Run the test
frepplectl test freppledb.my_app
The code for a unit test looks as follows:
data_admin_examples
   |- example1
   |- my-app
   |   |- __init__.py
   |   |- models.py
   |   |- migrations
   |   |   |- __init__.py
   |   |   |- 0001_initial.py
   |   |- serializers.py
   |   |- admin.py
   |   |- views.py
   |   |- urls.py
   |   |- menu.py
   |   |- fixtures
   |   |   |- my_app_data.json
   |   |- management
   |   |   |- __init__.py
   |   |   |- commands
   |   |       |- __init__.py
   |   |       |- my_command.py
   |   |- tests.py
class SimpleTest(TestCase):
  def test_basic_addition(self):
      self.assertEqual(1 + 1, 2)    # Just making sure
You can find more detailed information on https://docs.djangoproject.com/en/2.2/topics/testing/overview/
Even more information!
Data-admin is based on django web application framework. You can dig deeper by visiting https://www.djangoproject.com, checking out the full documentation and follow a tutorial.
Another good approach is to study the way the standard apps in frePPLe are structured. The full source code of the Community Edition is on https://github.com/frePPLe/frepple/tree/master/freppledb